• Home
    • About Nourishing Matters
    • About Emily
    • Frequently Asked Questions
  • Recipes
    • Offerings
    • Past Programs and Events
    • Experience and Teaching Style
    • Articles and Features
    • Travel
Menu

nourishing matters

Street Address
City, State, Zip
Phone Number
where wholesome meets delicious

Your Custom Text Here

nourishing matters

  • Home
  • About
    • About Nourishing Matters
    • About Emily
    • Frequently Asked Questions
  • Recipes
  • Work with Me
    • Offerings
    • Past Programs and Events
  • Yoga
    • Experience and Teaching Style
  • Press
    • Articles and Features
  • Adventures
    • Travel

Date Coco-Nut Truffles

October 3, 2016 Emily Watson

Best pick up line ever:

Guy: “So, do you want a raisin?” Girl, “No.” Guy, “How about a date?"

Me: Yesssssss, please...

There are a gazillion different versions of these date and nut energy balls all over the internet. You can even buy them in bar form (hello, Larabar!). I've tasted my fair share of different fruit and nut combos over the years, but have always been a little unsatisfied; the texture was off or the ratio of dried fruit to nut was wonky (except the peanut butter and jelly Larabar-they perfected that one). So I rolled up my sleeves, dug out the food processor, and was determined to make my own perfect little bite.

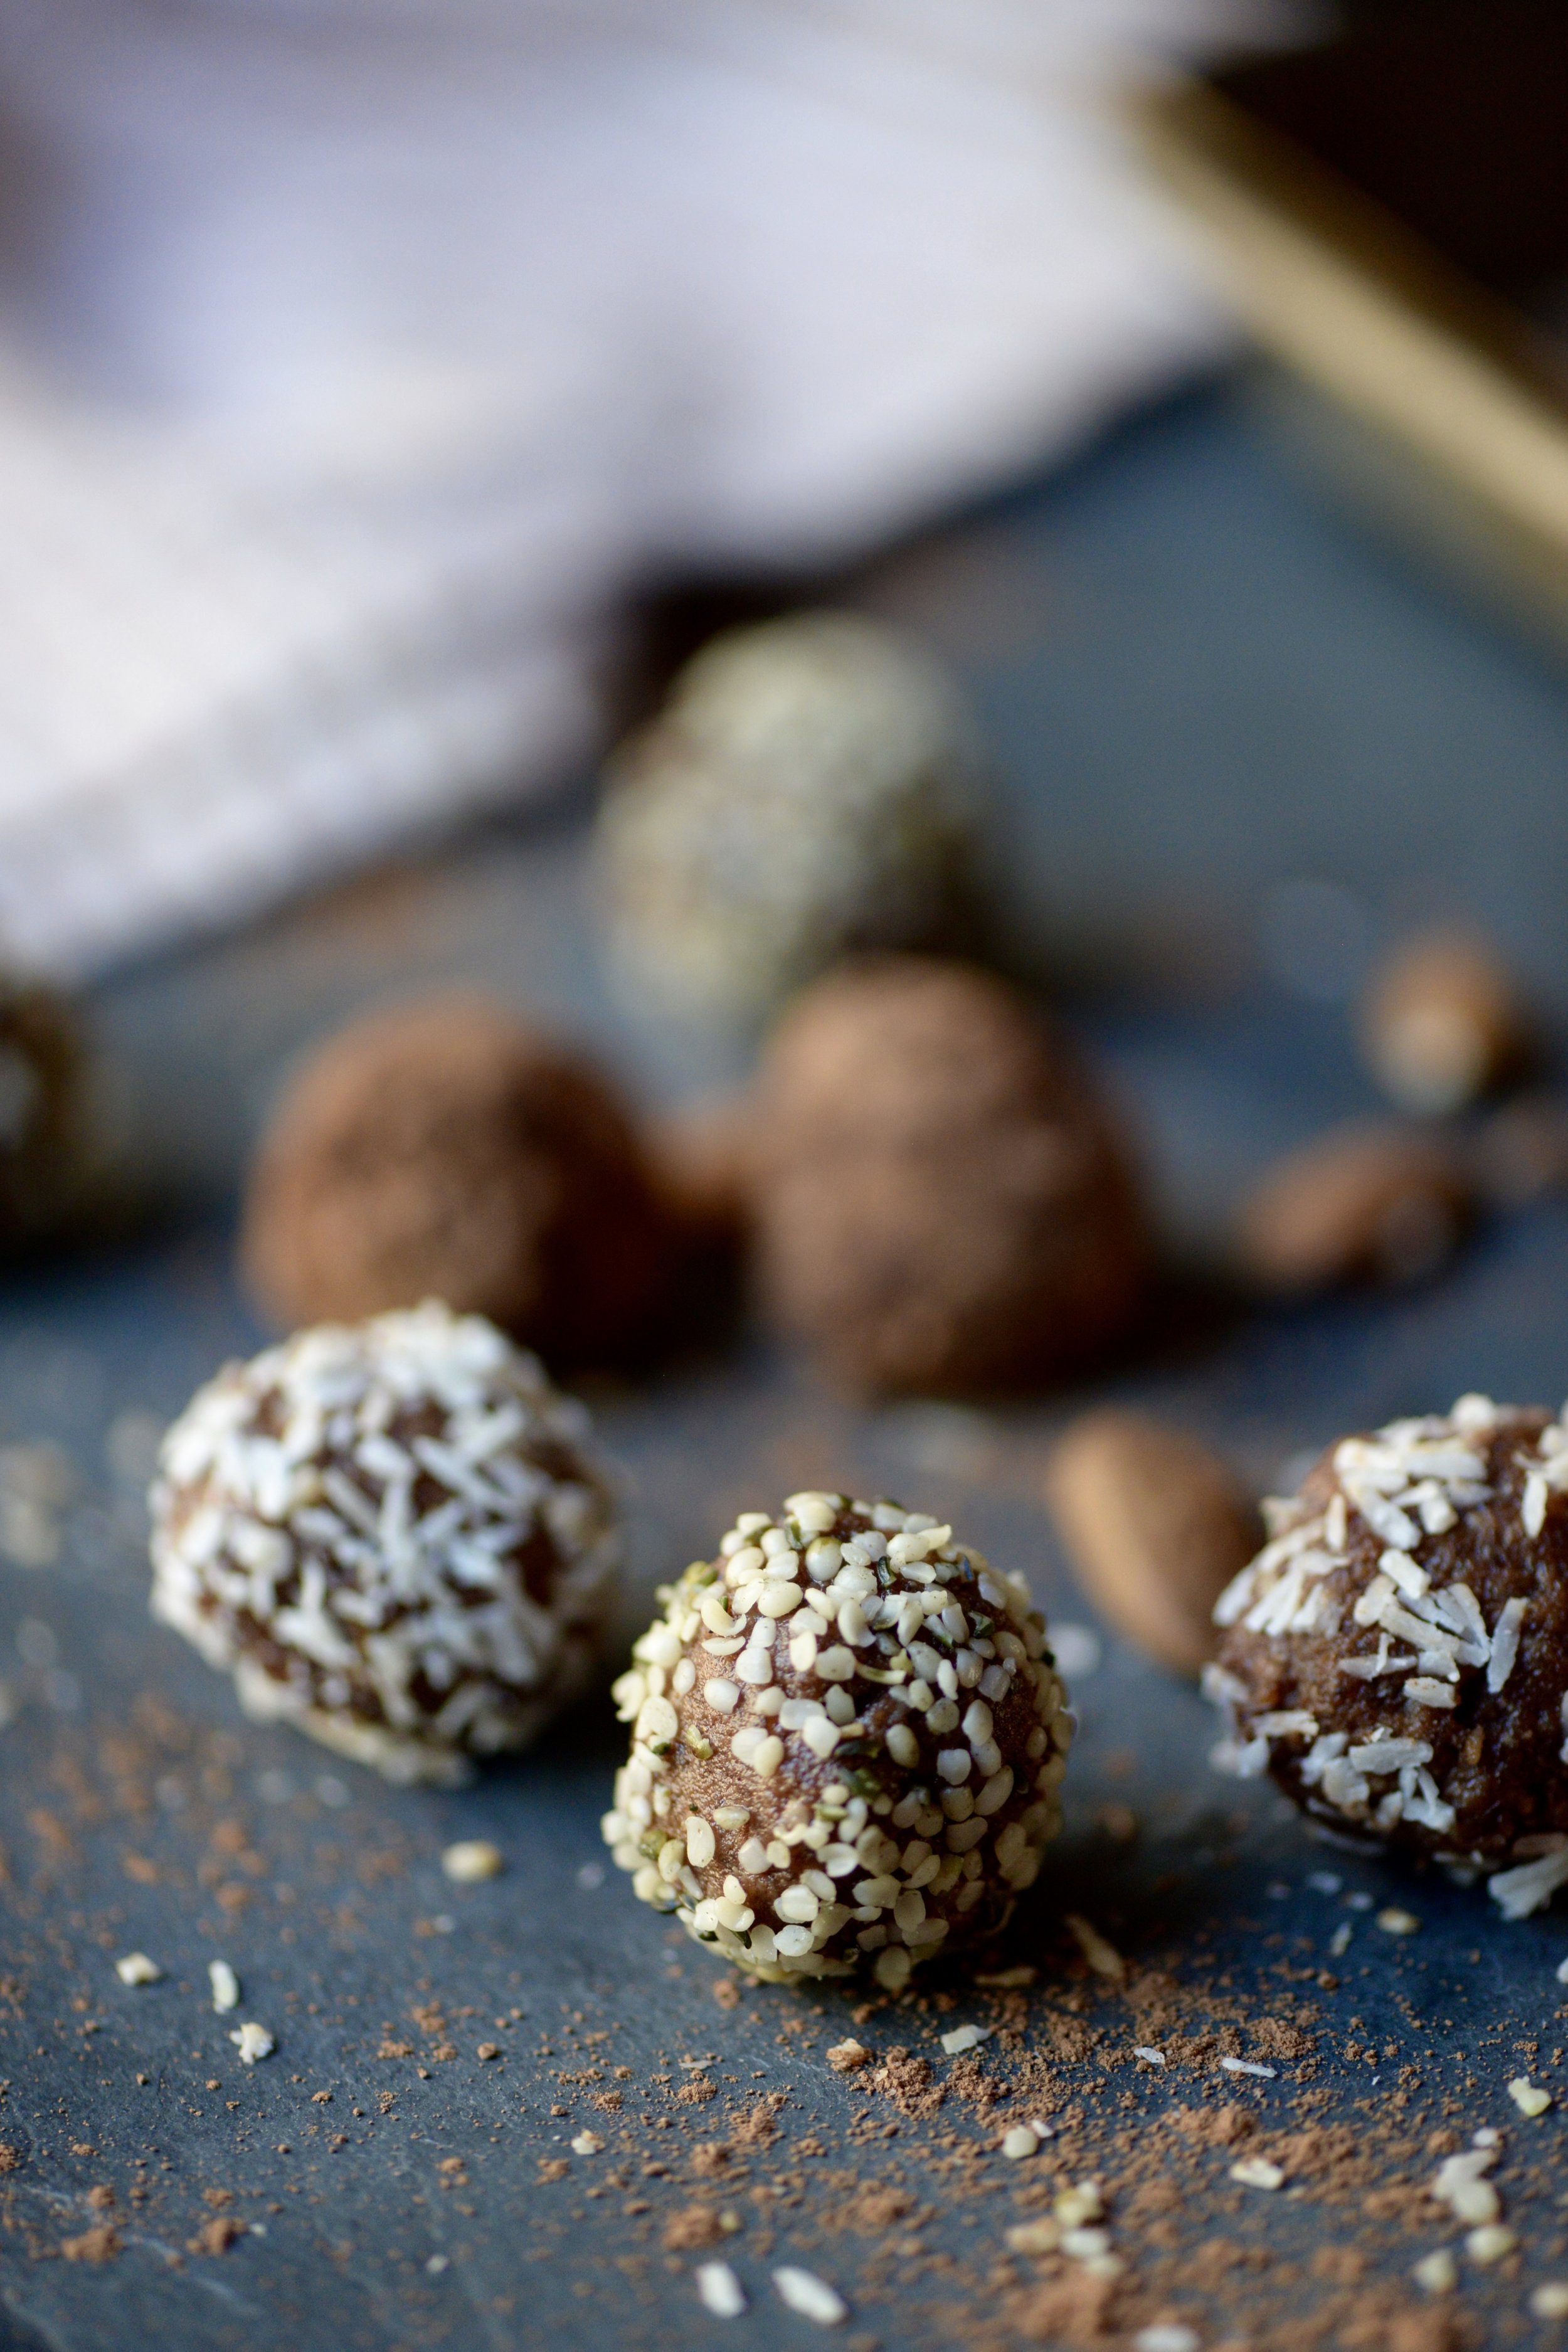
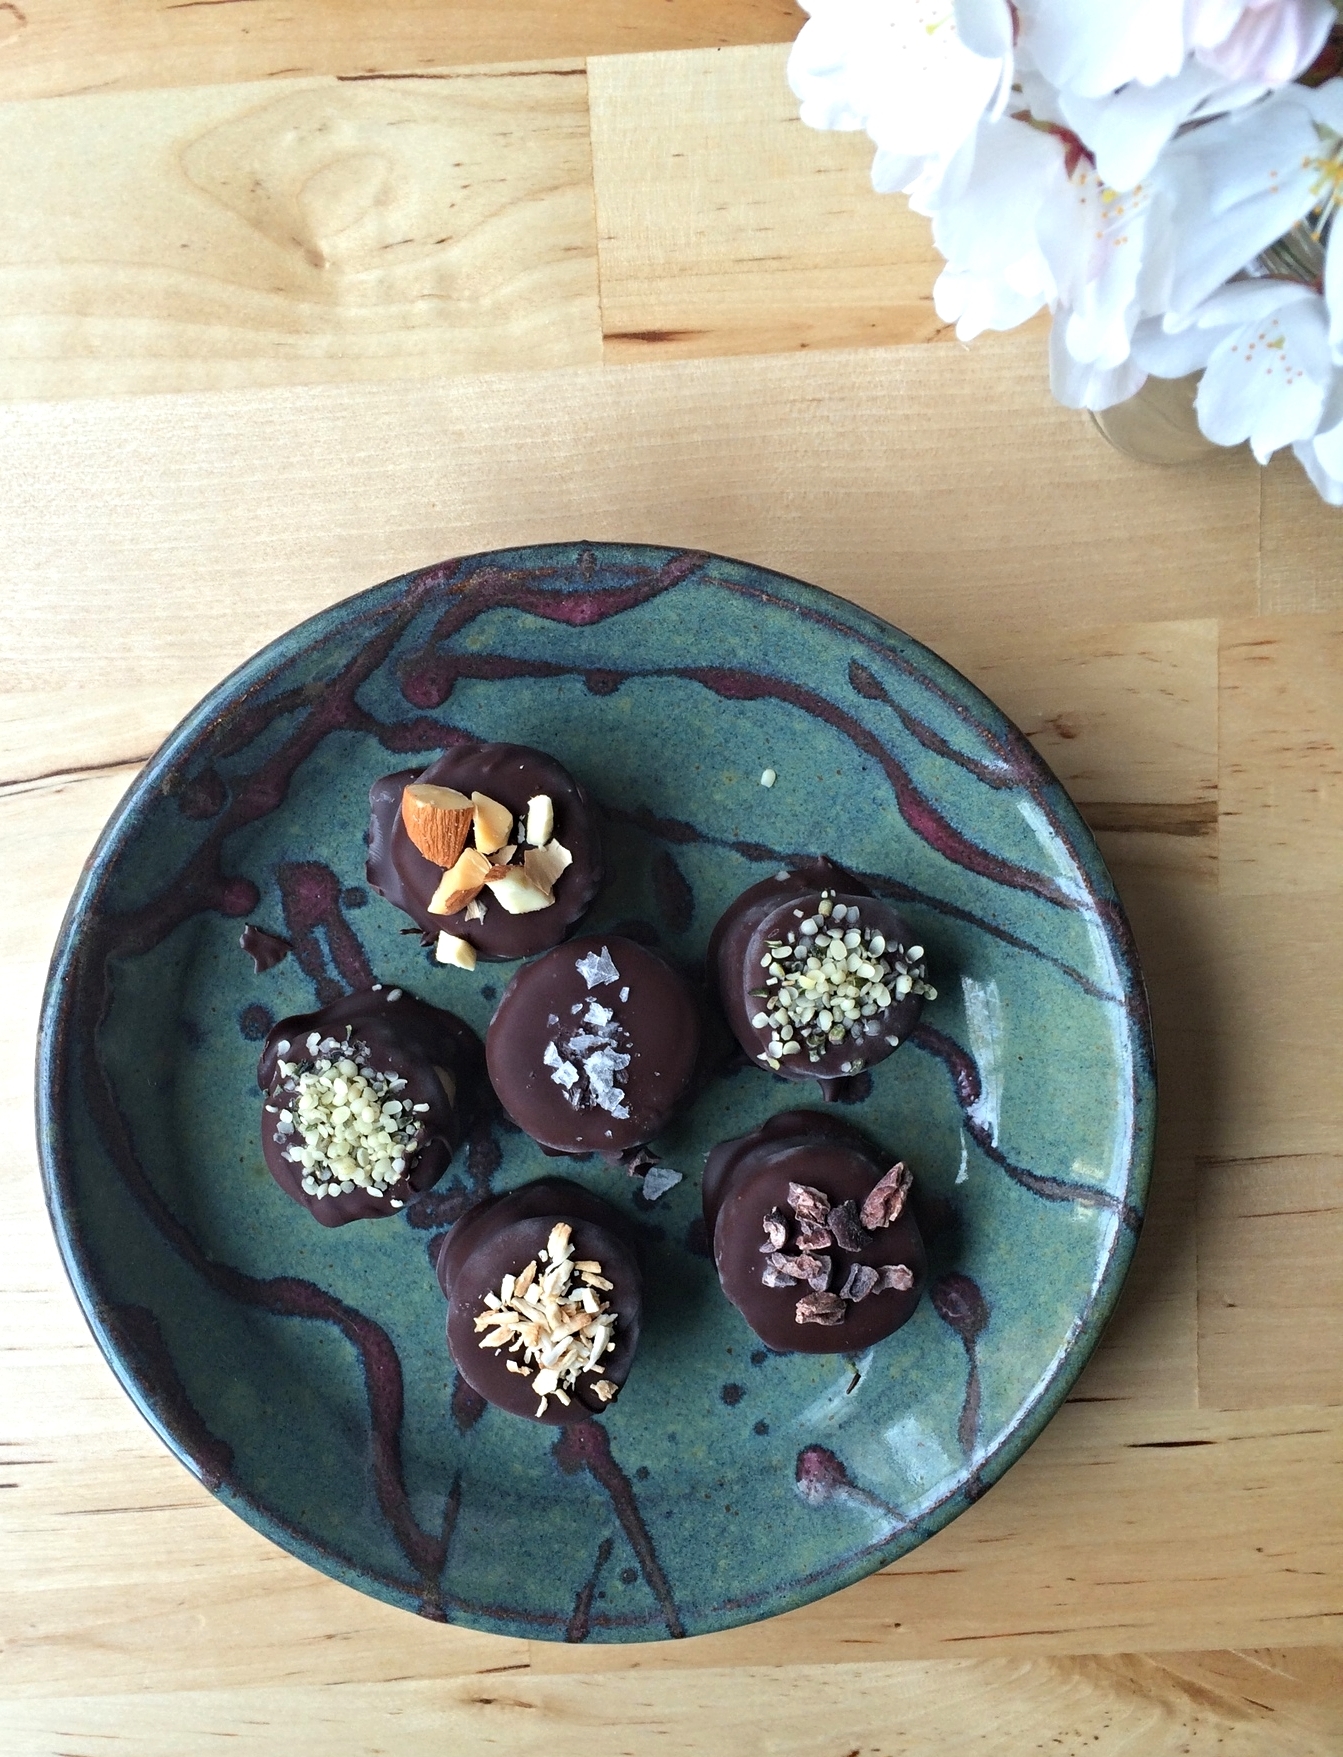
I love my Toasted Coconut and Almond Butter too much for that nutty combination not to be a starting point. From there I had to get the amount of dates right, balancing sweetness and texture. Too few dates led to a crumbly mess and too many resulted in a sweet and sticky web. I wanted to add cocoa to replicate a real chocolate truffle, but too much could be chalky and bitter and too little left my chocolate craving unsatisfied. Lots of trial and error later, and I leave you with this recipe, something I’m pretty darn happy with. It holds together just enough to roll into little balls, but doesn't compromise on any of the flavors. The little orb is perfect for eating plain or coating with a topping of choice.

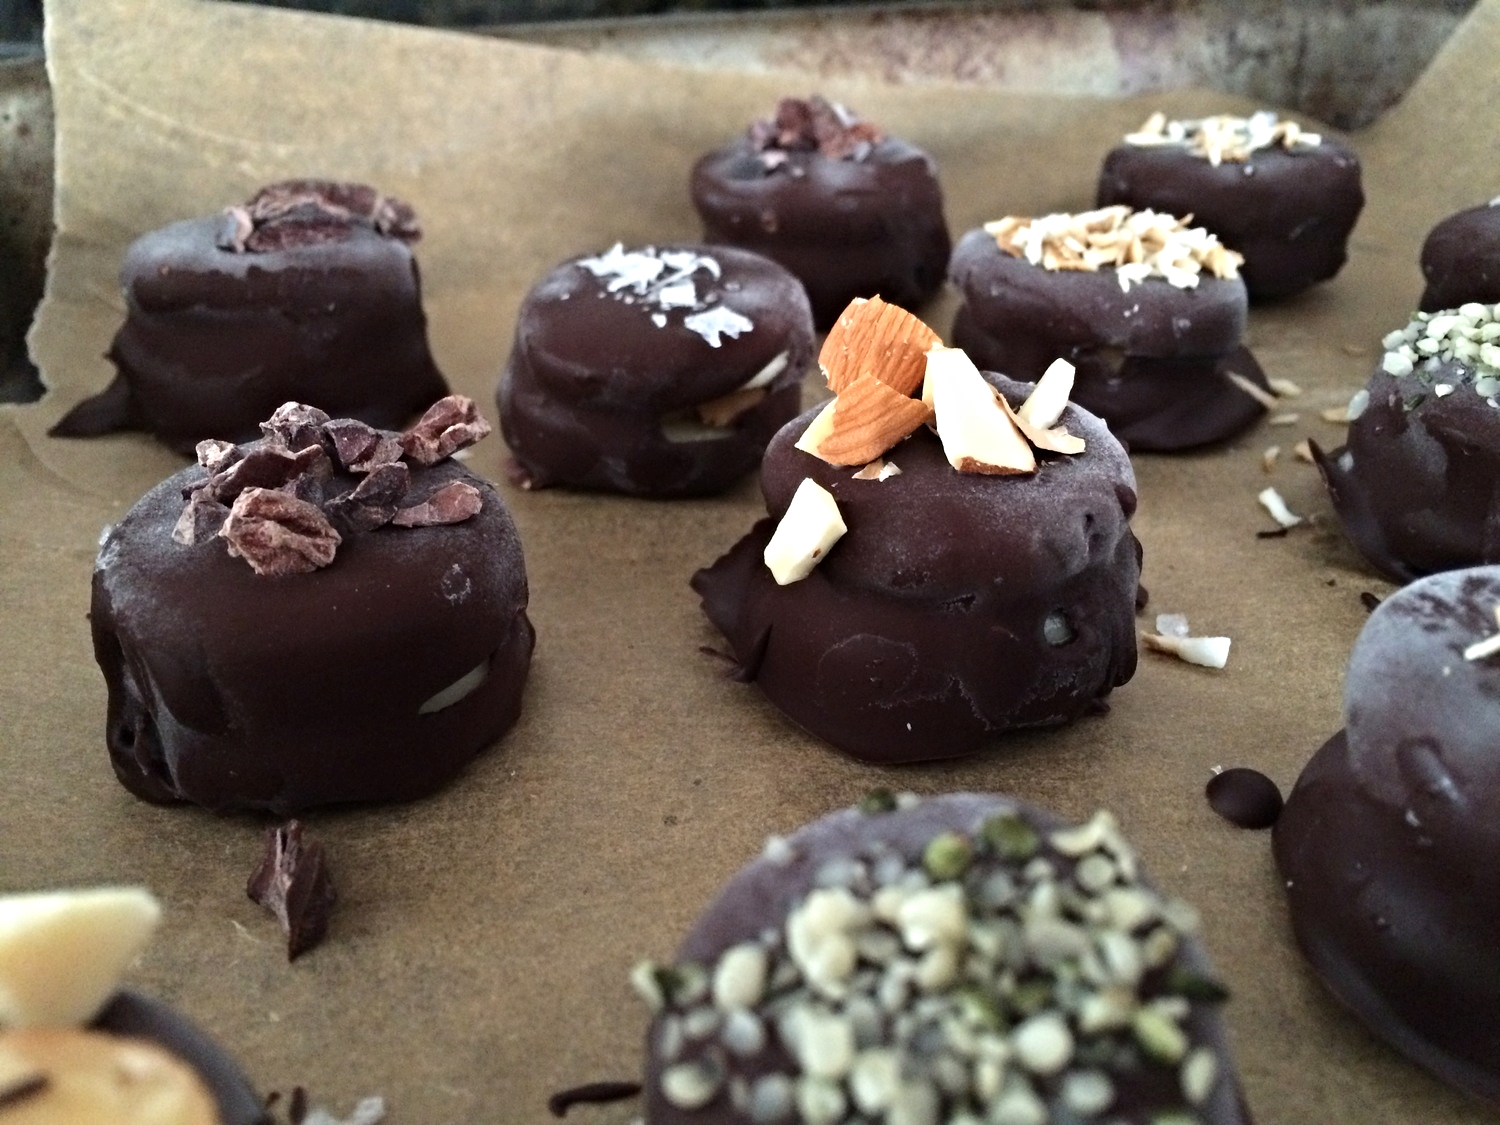
The only negative about this recipe is that it requires a food processor. Maybe a high-powered blender could work, but I haven’t tried it since it seems like you’d be stopping and scraping for ages. Please let me know if you do try it though. The mixture rolls best and sticks to the toppings when at room temperature, but they hold their shape best in the refrigerator or freezer. To up the chocolate ante, freeze them for a few hours, give them a dip in melted chocolate, sprinkle with toppings, and then return to the fridge until the chocolate sets.

DSC_4357.jpg
DSC_4392.jpg

Date Coco-Nut Truffles

1 cup almond butter, divided
⅔ cup unsweetened shredded coconut (I love it toasted!)
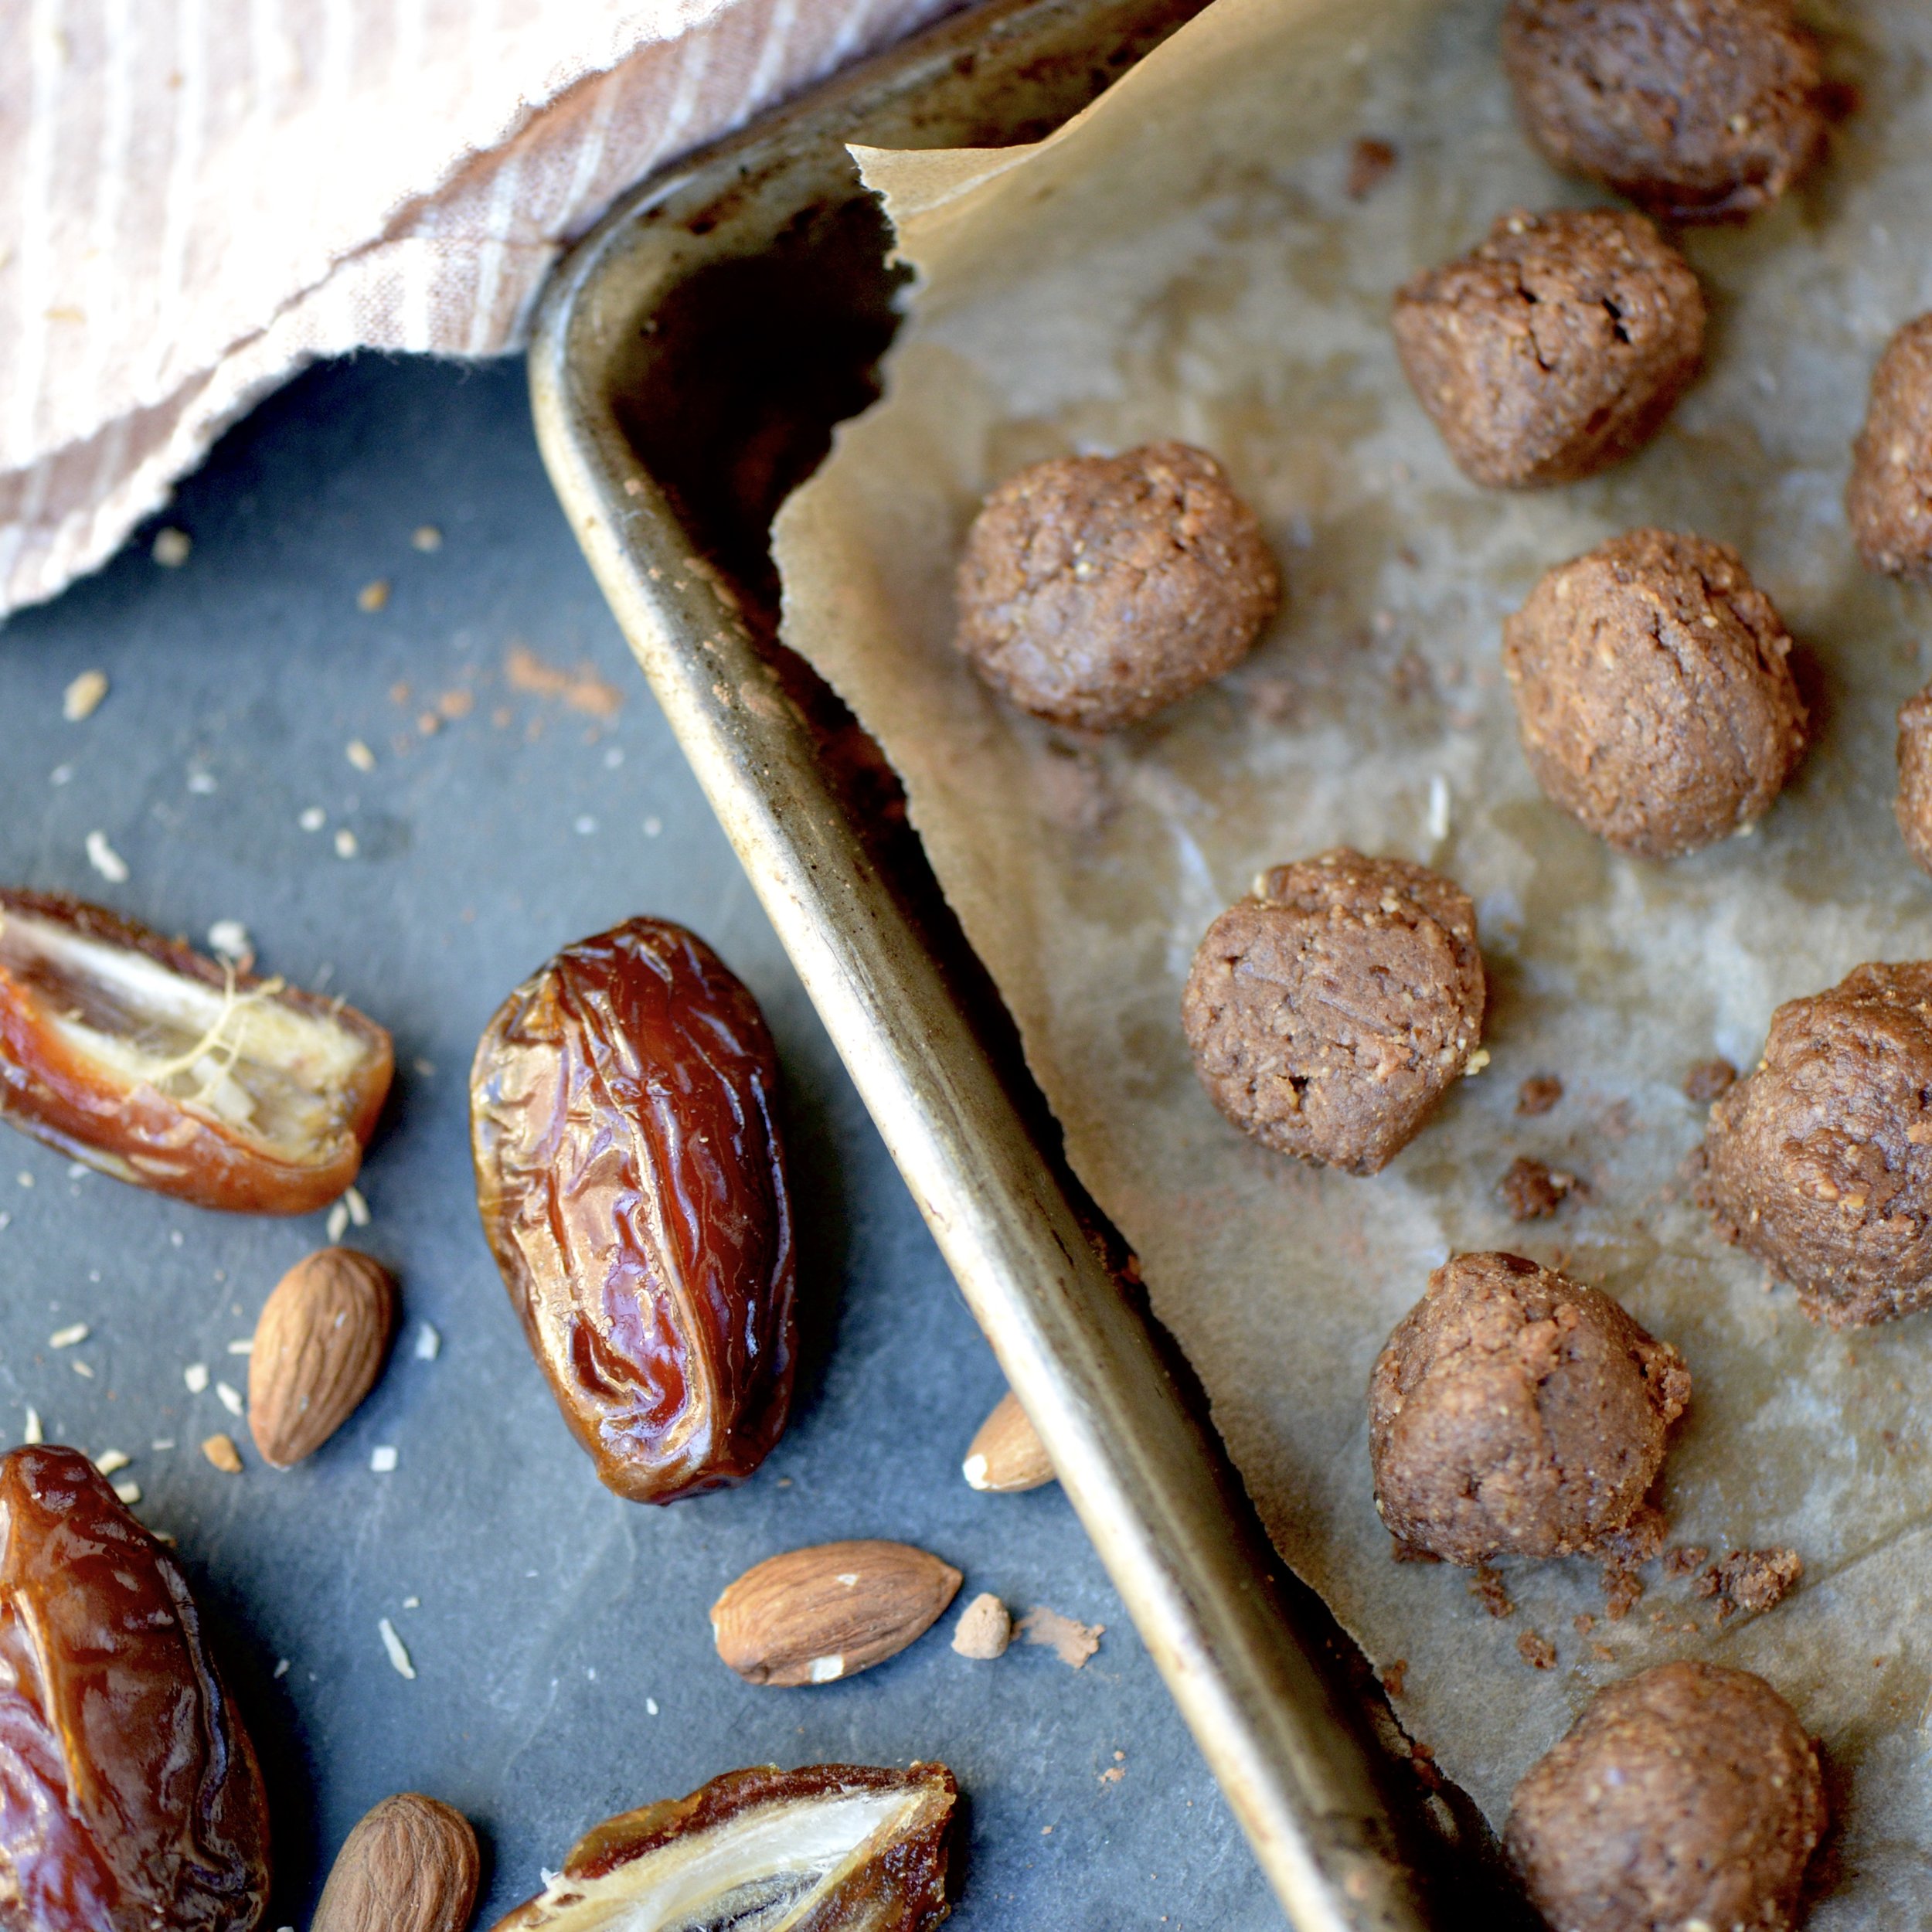
2 cups dates, pitted (about 16)
3 tablespoons cocoa powder
1 ½ teaspoons coconut oil
Pinch of sea salt

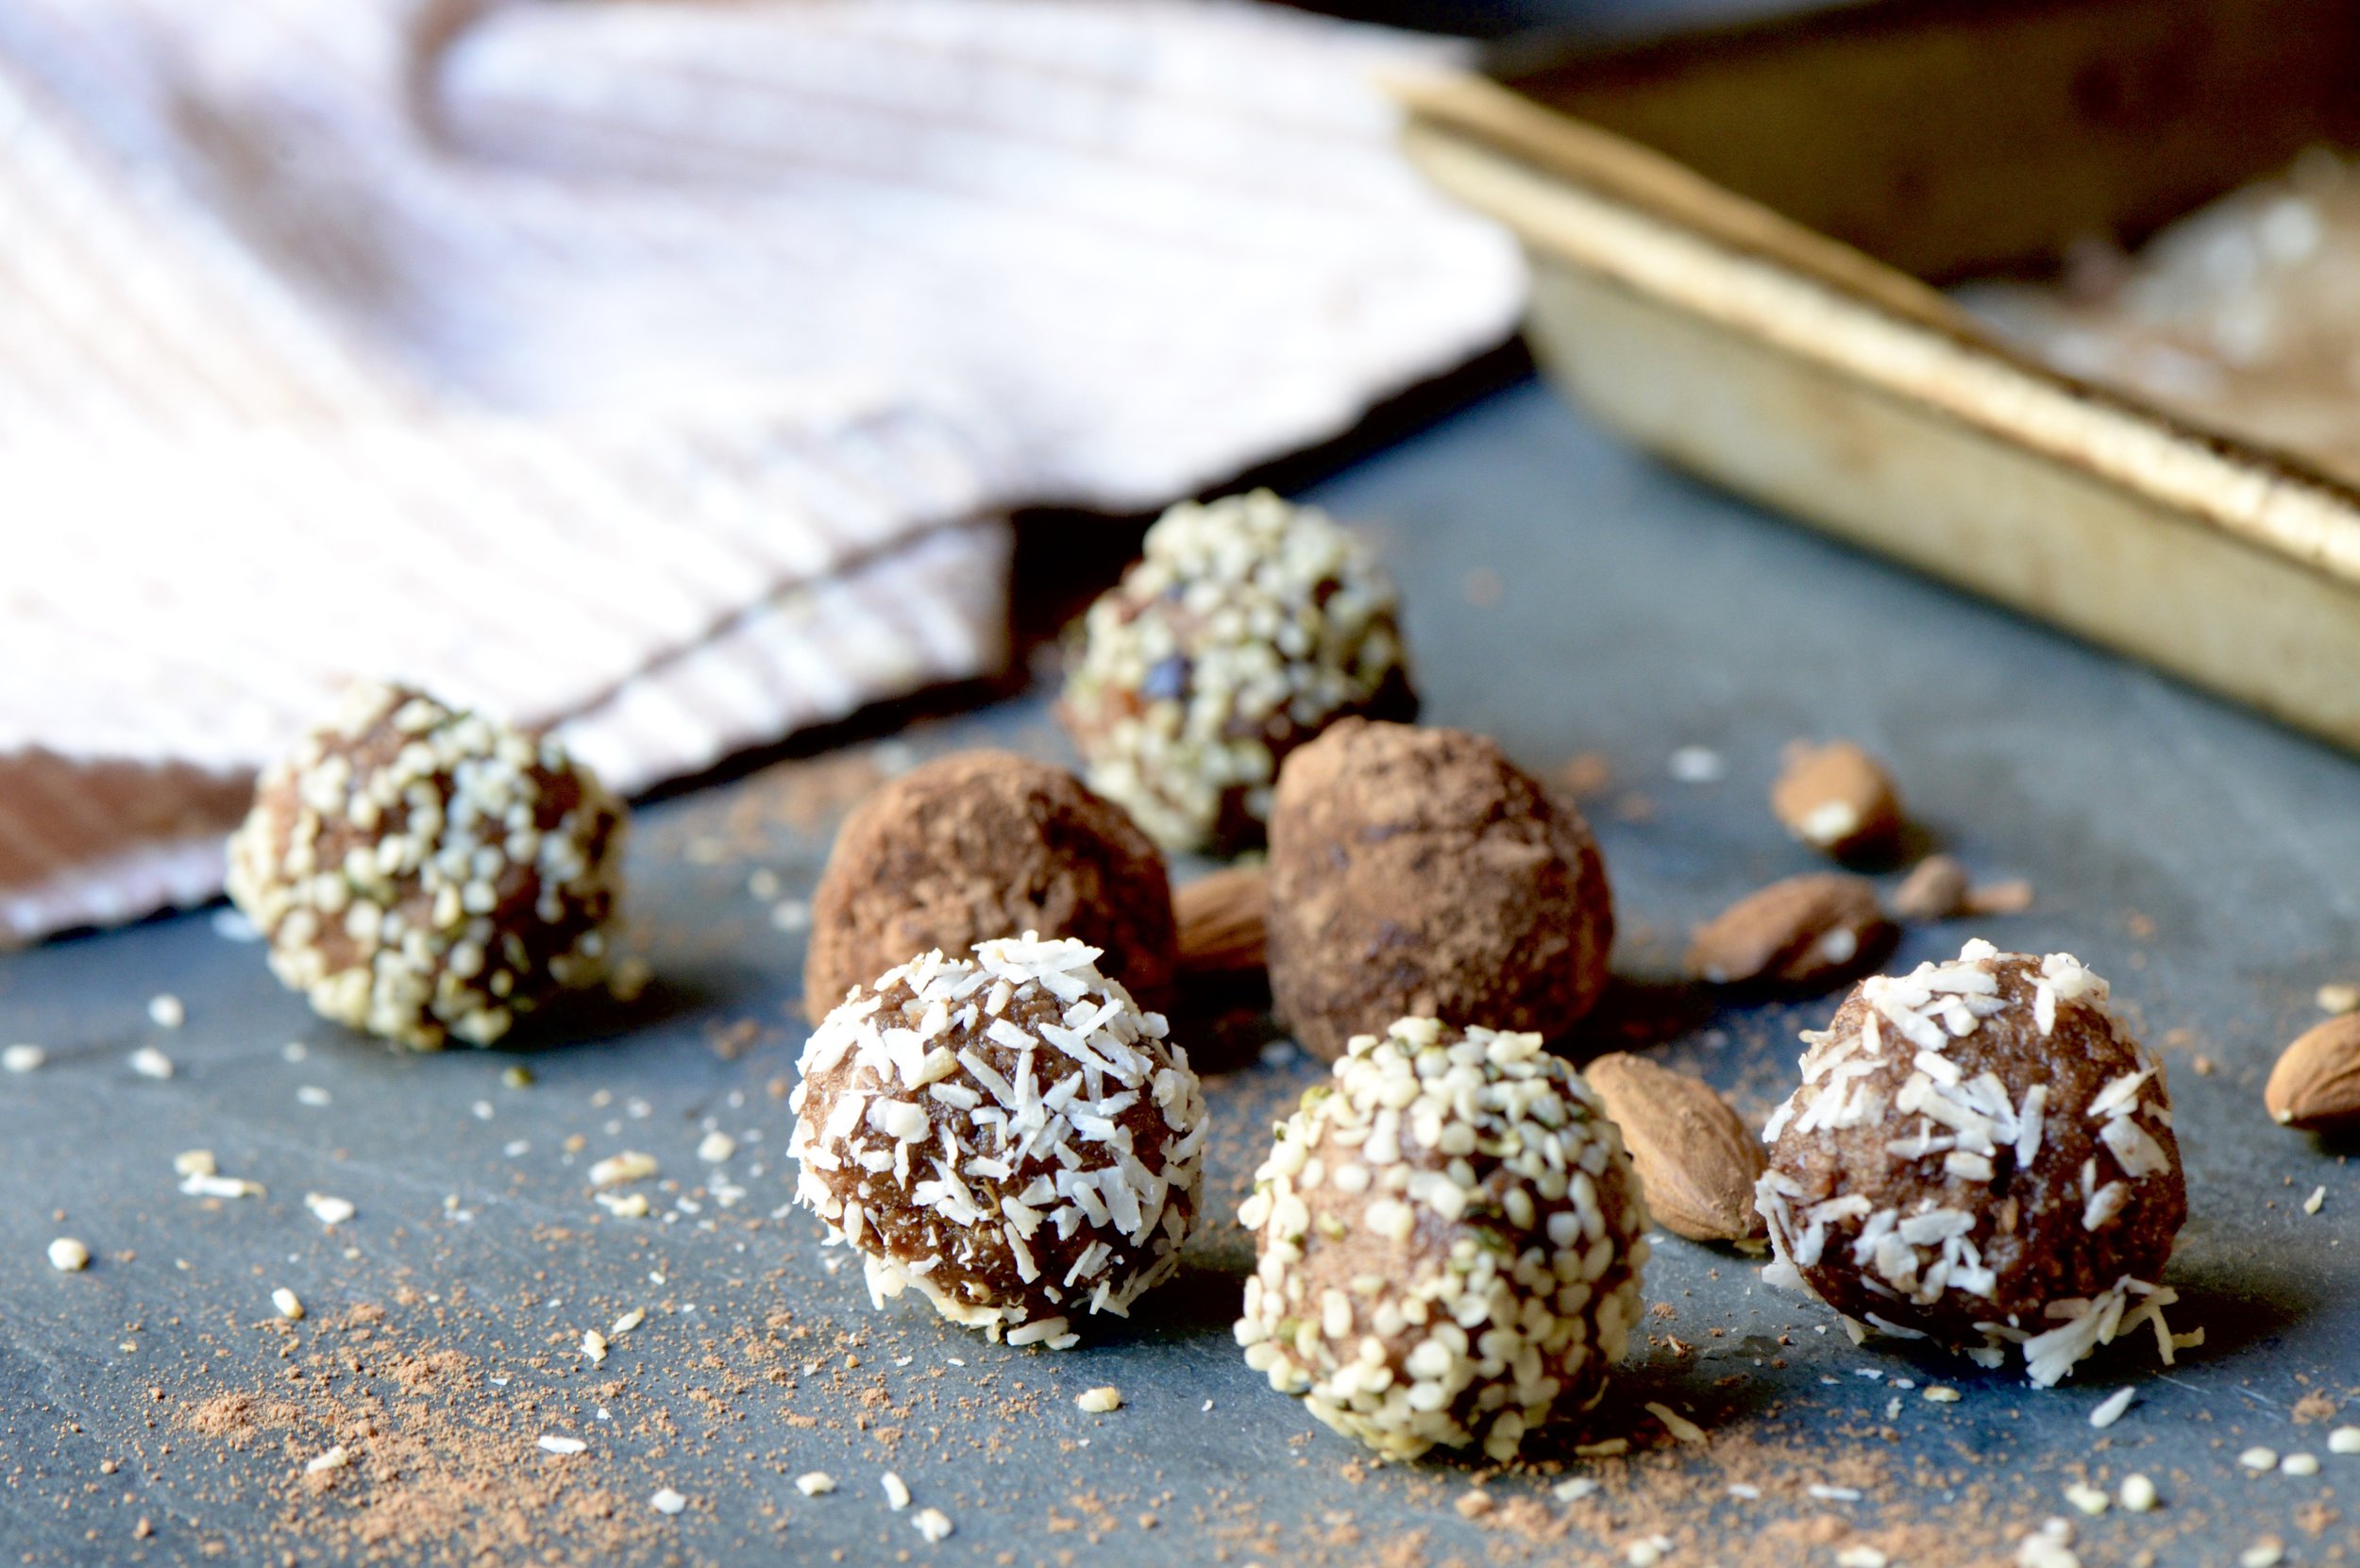
Optional toppings: finely chopped almonds, hemp seeds, goji berries, cacao powder, cacao nibs, toasted coconut

In a food processor, blend ¾ cup almond butter, coconut, dates, cocoa powder, coconut oil, and sea salt until smooth paste forms. Add remaining ¼ cup almond butter and pulse to combine. Using your hands, pinch off about 1 generous teaspoon of mixture and roll into balls. Roll balls into toppings of choice and store in the fridge or freezer.  Makes approximately 60 truffles.

DSC_4405.jpg


In Snacks Tags recipe, vegan, chocolate, dates, coconut, almonds, almond butter, snack
2 Comments

Chocolate Almond Overnight Oats with Coconut Whipped Cream

February 12, 2016 Emily Watson

One of my favorite things about Valentine's Day has always been seeing couples so smitten for one another. Something about the day puts people on their best behavior. I love seeing the guys with bouquets for their special someone, and the girls all dressed up on their way to a fancy prix fixe dinner.  We used to do the whole fancy dinner thing when we first started dating, but we are much lower key now. I actually prefer our quiet night in, leisurely making dinner and lounging on the couch. My fiance also used to get me the most beautiful lilies on special occasions, but then we got a cat who eats anything that she should not have, like lilies, which happen to be poisonous to frisky felines. To be honest, I do sort of miss the flowers, but I can make the sacrifice if it means no vet visits. One thing that has stayed the same over the years is the extra consumption of chocolate on Valentine's Day. Chocolate for dessert is a given, but why not have chocolate for breakfast?

These little cups are rich tasting, but still light on the belly. Nutty almond butter and rich cocoa powder make for a satisfying combo that tastes a bit like a brownie batter, and whipped coconut cream takes it to that extra special Valentine's Day level. If you have never made whipped cream with coconut milk, it is super simple. The hardest part is remembering to refrigerate the coconut milk overnight. Angela from Oh She Glows has a wonderful step-by-step tutorial for Coconut Whipped Cream if you need a visual. Considering the oats have to soak overnight anyway, I promise you cannot and will not miss that crucial first step.

Do your sweetheart a favor- or yourself for that matter, and make this. Combine everything the night before, whip the coconut cream in the morning, and win major brownie points. Pun most definitely intended.

Chocolate Almond Overnight Oats with Coconut Whipped Cream

1 cup rolled oats
3 tablespoons almond butter
1 1/4 cups almond milk
2 tablespoons cocoa powder
2 1/2 teaspoons honey or maple syrup
pinch of salt
1 tablespoon dark chocolate shavings, divided
fresh raspberries, for serving
2 dollops of coconut whipped cream, for serving (see below)

Combine oatmeal with almond butter, almond milk, cocoa powder, honey or maple syrup, and pinch of salt. Mix well and allow to soak overnight. In the morning, divided into two portions, sprinkle with chocolate shavings, fresh raspberries, and a dollop of coconut whipped cream. Enjoy! Serves 2.

Coconut Whipped Cream

1 can full fat coconut milk
2 1/2 teaspoons honey or maple syrup

Place can of coconut milk in refrigerator overnight. Scoop the thick cream from the top and add it to a medium bowl. The liquid left behind can be added to smoothies. Using an electric mixer, beat the coconut cream until fluffy and light, for about 2-3 minutes. Stir in honey or maple syrup. Store in fridge for up to 3 days. Re-whip as necessary.


DSC_3065.jpg
DSC_3075.jpg
DSC_3079.jpg
In Breakfast Tags chocolate, breakfast, oatmeal, almond butter, coconut milk, vegan, gluten-free, vegetarian
1 Comment

30 + Chocolate and Hazelnut Tin Can Cake

December 5, 2015 Emily Watson

Just a few months ago, I was cleaning out my closet with my sister, and I pulled out this cute little black dress. It was made of a soft and stretchy material and had a flowy little skirt. Minus the little skirt, it was a pretty conservative number with short sleeves and a crew neck that covered even my collar bones, so I was a bit surprised by my sister's reaction when I held it up to her. I expected her to ooh and ahh at how cute the dress was, ask me where I got it, and do that whole girly thing, but instead what I got was, "You're too old for that." I stuffed the dress back into the closet, lost total interest in going through the rest of my clothes, and wondered what else was I too old for. 

I sulked about my twenty-nine years for about two weeks after that, thought about how I should have been more established in my career by now, about how I should have been more adventurous in my twenties, about how I should have worn that little black dress more times than I did when I was still "young," still allowed. I went on this downward spiral of feeling sorry for myself, about those lost opportunities, about the shoulda-woulda-couldas. I know, I was being a bit dramatic, but my sister's comment stung. I know she did not mean it to be so harsh, but I took it way more personally, probably because I was a bit sensitive about getting older anyway, about entering another decade and dealing with the expectations of what someone in his or her thirties does and does not do.

I finally snapped out of my little self-pity phase. When my 30th birthday finally rolled around earlier this week, I was ready to celebrate not the old shoulda-woulda-couldas, but the shall, will, and can do's. My twenties brought some pretty exciting experiences in my life, all for which I am grateful, but I am making sure that my thirties top it.

No more pity party over here, just this delicious little chocolate and hazelnut cake.

Before getting to the recipe, I have to say that my family is always so wonderful about celebrating my birthday over Thanksgiving. For the past few years, they have gotten me one of those super-addicting cookie cakes from the Great American Company, and each and every year, it somehow gets destroyed. One year it was dropped, another year, it somehow got folded up like a cookie taco by the time it made it home, and this year, my little sister's new dog "who never eats food off of the counter," licked half of the icing off of the cake. Unfortunate, but silly events, and I am grateful for a family that goes through the trouble of celebrating my birthday when we can all be together.

Now onto this cake! I wanted to make a little cake because there are only two of us at home, but also because just how cute is this?! This was inspired by a mix of recipes from around the web, but I picked chocolate and hazelnut because 1) I love chocolate and hazelnut (see these truffles) and 2) I wanted a fancy combo to ring in this new decade.

The tin can bit was inspired by a cake at the Domestic Goddess. I adapted the batter from a Mini One Bowl Yellow Cake at The Cake Merchant but made some changes in the prep and used coconut sugar to give it a richer, caramel flavor. The icing is my own creation.

Chocolate and Hazelnut Tin Can Cake

Cake:
1/2 cup plus 1 tablespoon whole wheat pastry flour
1/2 teaspoon baking powder
1/2 teaspoon salt
2 1/2 tablespoons unsalted butter, softened
1/3 cup coconut sugar
3 tablespoons kefir or buttermilk
1 large egg
1/2 teaspoon vanilla extract

Frosting:
1/4 cup unsalted butter, softened
1/2- 3/4 cup coconut sugar (or powdered sugar for a smoother frosting)
3 tablespoons nutella or other chocolate hazelnut spread
2 teaspoons cocoa powder
1/4 teaspoon kosher salt
1 cup chopped toasted hazelnuts (skins removed after toasting)

For the cake, preheat oven to 350 degrees Fahrenheit. Grease a clean 28 ounce tin can and line bottom and sides with parchment paper.

In a bowl, whisk together flour, baking powder, and salt. In a separate bowl, beat the butter and sugar until light and fluffy with an electric mixer. Add kefir or buttermilk, egg, and vanilla, and beat for about a minute or until well combined. Slowly sprinkle in flour mixture. and beat for 45 seconds or until mixture is smooth, scraping down the sides often.

Pour batter into prepared tin can, bang can on counter to get out any air bubbles, and bake for 35-45 minutes or until toothpick poked into center comes out clean. Cool on wire rack for 15 minutes. Remove from can and allow to cool completely.

Meanwhile, prepare frosting. Cream butter and sugar together until light and fluffy. Start with 1/2 cup sugar and add more sugar to taste. Beat in nutella, cocoa powder, and salt until well combined. Set aside until cake has cooled completely.

To frost cake, remove top rounded portion of cake until top is level. Cut cake into two even layers. Apply an even layer of frosting on the bottom layer (about 1/3 of the frosting), then top with second layer. Apply a thin crumb-coating all over cake, place in fridge for 10 minutes to firm up, and then continue to frost cake with remaining frosting. Press chopped hazelnuts into side of cake. Cake is best eaten the day it is made, but you can store it in the fridge overnight. Enjoy! Makes 1 4-inch two layer cake.

IMG_0668.jpg
DSC_2325.jpg
DSC_2350.jpg
DSC_2372.jpg
In Sweets Tags cake, dessert, chocolate, hazelnut
Comment

Chocolate Chip Pumpkin Bread

October 9, 2015 Emily Watson

What's your favorite way to celebrate fall? I still have not brought out my boots or unpacked my fall sweaters, but I have brought out the canned pumpkin. The thing with canned pumpkin is that a can (or now there is pumpkin in easy-to-open cartons!) can go a long way. You can get creative with adding a little bit of pumpkin to this or that, and it generally turns out pretty tasty. Think pumpkin in your oats, swirl some pumpkin into soup, add a little to curry or a nice stew. In baked goods, pumpkin tends to keep things moist but it also lends a more cakey texture. Pumpkin cookies tend to be fluffier rather than crispier, and cakes with pumpkin tend to have just a lighter crumb.

This quick bread is perfect as a breakfast or as a snack because it is not too heavy or too sweet. I season it with some favorite fall spices like cinnamon, ginger, nutmeg, and allspice, and I love chocolate chips with pumpkin so could not resist throwing in some semi-sweet chocolate that I chopped from a bar. If milk chocolate is your thing, use that instead. It is a mix and dump sort of bread, but do not let it's ease fool you. It is tasty and will whisk you into fall, even if you are still wearing those flip=flops.

Do you have a favorite pumpkin bread recipe? Or another favorite pumpkin treat?

DSC_1598.jpg

Chocolate Chunk Pumpkin Bread

1 1/2 cups spelt flour or whole wheat pastry flour (or a mix of wheat and all-purpose)
1 teaspoon ground cinnamon
1/4 teaspoon ground ginger
1/8 teaspoon ground nutmeg
1/8 teaspoon ground allspice
1 teaspoon baking soda
1/2 teaspoon salt
2 eggs
1 teaspoon vanilla extract
1/3 cup coconut oil, melted, or vegetable oil
1/3 cup honey, preferably local or maple syrup
1 cup pumpkin puree
1 cup chocolate chunks of chocolate chips (I used semi-sweet)

Preheat oven to 350 degrees Fahrenheit. Grease a loaf pan and line with parchment paper to create a sling that is easy to lift out.

Mix dry ingredients in a small bowl (flour through salt). Whisk wet ingredients in another bowl until smooth (eggs through pumpkin puree). Stir dry ingredients into wet until just mixed. Stir in chocolate chunks.

Pour batter into prepared pan. Bake on middle rack for 45-50 minutes or until toothpick comes out with just a few crumbs stuck to it. Remove pan from oven and allow bread to cool for 10 minutes in pan. Remove from pan and allow to cool completely on wire rack. Slice and serve. Enjoy! Makes 1 loaf.

DSC_1558.jpg
DSC_1572.jpg
DSC_1575.jpg
In Breakfast, Sweets Tags recipe, chocolate, pumpkin, fall, baking
1 Comment

Frozen Chocolate Covered Banana Nut Butter Bites

April 15, 2015 Emily Watson

Now that it is finally getting warmer, I am craving frozen treats. I frequently find my older sister munching on these frozen chocolate covered bananas. Have you ever had them? The whole concept sounds totally delicious except for the fact that my sensitive front teeth cannot handle taking a bite out of the things. Way too cold. I had come across a recipe for smaller chocolate covered banana slices back in college, made them, and liked them, but I always felt that they could use a little oomph. Hence, these little bites. Now I thought I was pretty darn smart for coming up with these little sandwiches, but it turns out that there are already similar creations out there- or at least there is already a similar creation out there. I only found this out after starting to write this post, when I took a break to peruse Pinterest and behold, there was a version right there on my welcome page. So to celebrate great minds (and tummies) thinking alike, here is the link to that recipe.

These little bites combine a few of my favorite things: bananas + nut butter + chocolate. This is essentially a template for a frozen banana sandwich, but you can really customize it to what you like. I used peanut butter and almond butter, but you could use sunflower seed butter, pecan butter, even coconut butter. Now that I am typing that, I think coconut butter would be really tasty...I melted a 70% dark chocolate for the coating, but if you prefer milk, do that instead! The beauty is that you really cannot mess this up. It is guaranteed that you will get a delicious result.

These are a fantastic post-workout snack given that they will help you replenish your carbohydrates and supply you with protein. The bananas give you a little potassium, and if you top with hemp seeds, you get even more healthy fat. These can be made on the weekend to keep you fueled for your week ahead. Just grab a few from the freezer when you need a pick-me-up.

Frozen Chocolate Covered Banana Nut Butter Bites

1 medium banana, peeled and sliced into 1/4 inch slices (you can snack on the pointier ends)
3-4 T. nut butter of choice, I used half peanut butter and almond butter
4 oz. chocolate, I used 70% dark but other types will work
Toppings, optional: sea salt, chopped toasted almonds, toasted coconut, cacao nibs, hemp seeds

Line a small baking sheet or a plate with parchment paper. Place about 1/2 teaspoon of nut butter on one half of one banana slice and top with another slice, pressing down gently to create a banana- nut butter sandwich. Complete with the remaining bananas. Place the baking sheet in the freezer for about 1 hour for the sandwiches to firm up.

IMG_5304.jpg
IMG_5308_2.jpg
IMG_5312.jpg
IMG_5315.jpg

Right before removing the sandwiches from the freezer, melt your chocolate. I used a double boiler method, placing the chocolate in a metal bowl over simmering water and stirring to melt, but you can also melt the chocolate in a microwave safe bowl in 20-30 second increments, stirring after each increment. Remove the chocolate from the heat once completely melted. Prepare your toppings if you choose to use them.

IMG_5327_2.jpg
IMG_5337_2.JPG

Remove the banana sandwiches from the freezer. One at a time, dip the bananas in the melted chocolate, and use two forks to remove them, allowing the excess chocolate to drip off. Return to the parchment. The cold bananas will cause the chocolate to harden quickly, so be ready to sprinkle your topping of choice on top before the chocolate sets. Complete with the remaining banana sandwiches. Return to the freezer for at least 30 minutes so the chocolate can fully harden. Store in the freezer. My medium sized banana made 13 bites, but it depends on the size of your banana as to how many will be made and how much nut butter you will use.

IMG_5378.JPG
IMG_5353_2.jpg
IMG_5371.JPG
In Sweets Tags recipe, bananas, chocolate, nut butter, peanut butter, almond butter, snack, vegetarian, gluten-free
5 Comments
Older Posts →
Hi! I'm Emily. I love to cook whole, nourishing foods, and this is where I share my kitchen experiments and sometimes a little bit of life.

Hi! I'm Emily. I love to cook whole, nourishing foods, and this is where I share my kitchen experiments and sometimes a little bit of life.

Featured
  • July 2017
  • May 2017
  • April 2017
  • March 2017
  • February 2017
  • January 2017
  • December 2016
  • November 2016
  • October 2016
  • September 2016
  • August 2016
  • July 2016
  • June 2016
  • May 2016
  • April 2016
  • March 2016
  • February 2016
  • January 2016
  • December 2015
  • November 2015
  • October 2015
  • September 2015
  • August 2015
  • July 2015
  • June 2015
  • May 2015
  • April 2015
  • March 2015
  • February 2015

  • Appetizers 18
  • Breakfast 18
  • Life 4
  • Mains 39
  • Miscellaneous 2
  • Salads 21
  • Sandwiches 6
  • Side Dishes 8
  • Smoothies 4
  • Snacks 10
  • Soups 14
  • Spreads Dips Sauces 5
  • Sweets 6
  • Vegetarian 1

  • almonds
  • appetizers
  • autumn
  • avocado
  • breakfast
  • brown rice
  • chickpeas
  • chocolate
  • cilantro
  • coconut
  • coconut milk
  • fall
  • gluten-free
  • kale
  • lentils
  • make ahead
  • mint
  • oatmeal
  • recipe
  • salad
  • snack
  • soup
  • spring
  • summer
  • sweet potatoes
  • tahini
  • vegan
  • vegetarian
  • walnuts
  • winter

subscribe

Sign up with your email address to receive new posts directly

We respect your privacy.

Thank you!

All photographs, recipes and content are property of Nourishing Matters, unless otherwise noted. Please do not redistribute without my permission. Thank you!

Powered by Squarespace